안전한 파일 파쇄 절차 설명
Step by Step Instruction for Safe File Shredding Mode
파일과 폴더를 삭제하고 누구도 복구할 수 없도록 하는 방법. 파일을 다른 저장 장치로 이동하고 모든 흔적을 지우는 방법.
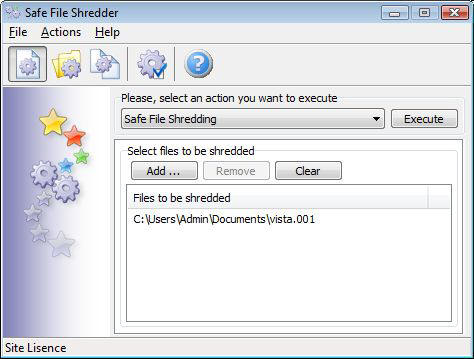
File Shredding Mode
To run the files shredding operation you should:
1. Activate the «Safe File Shredding» mode (This mode is active by default when the program starts)
2. Select a set of files to be shredded
3. 파쇄 과정을 실행
Open the actions list and select the “Safe File Shredding” action.
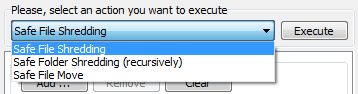
![]() To activate the “Safe File Shredding” mode
To activate the “Safe File Shredding” mode
you can also press the first menu button.
Select files to be shredded
Press Add … button to open the standard Windows dialog.
To select a single file you should choose it and press the Open 단추.
To select multiple files you should do the following:
Select the first file of the sequence, hold the Shift key and click on the last file you wish to select. Or you can hold the Ctrl key and continuously click each file you want to be selected.
After that you can press the Open button and the set of files will be added to the shredder list. 분명한 button allows you to erase the shredding list, just press this button if you wish to completely remove all selected files. 와 함께 Remove button you can remove one or multiple files from the shredder list. To remove a single file, select it and press the Remove 단추. To remove a set of files you should select multiple files and press the Remove 단추.
Execute the files shredding
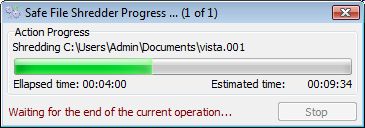
파쇄를 시작하려면 실행하다 단추. 프로세스가 시작되고 진행률 표시기가 표시됩니다..
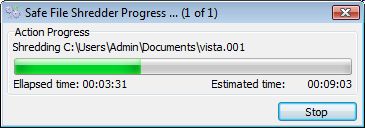
메모: 이미 처리된 파일은 영원히 파쇄됩니다. !
파쇄 작업을 중단하려면, 당신은 눌러야합니다 Stop 단추. 프로그램은 현재 작업이 끝날 때까지 기다리도록 요청합니다..
현재 작업이 완료되면, 확인 대화 상자가 표시됩니다.

분쇄기 작업이 완료되면, 다음 메시지 중 하나를 받게 됩니다.:
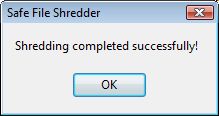
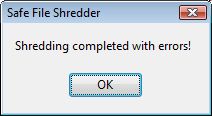
작업이 성공적으로 완료되었습니다. 작업이 오류와 함께 완료되었습니다.
오류가 발생한 경우 오류 로그를 볼 수 있습니다.. 로그 결과 창에서 오류 메시지만 보거나 전체 프로세스 메시지를 보는 옵션을 선택할 수 있습니다.. 오류는 빨간색으로 표시됩니다..
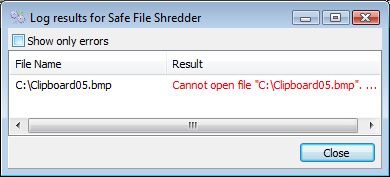
자주 발생하는 오류 중 일부:
파일을 열 수 없습니다 (파일이 다른 애플리케이션으로 차단되어 분쇄기가 해당 파일을 처리할 수 없습니다.) 이 파일을 사용하고 있는 응용 프로그램을 닫고 다시 시도하십시오..